Creating a GitHub Code Coverage Badge using Kover
- The big picture
- Create a gist
- Create a gist token
- Create a gist secret
- Create a gradle task
- Running the task
- GitHub Actions workflow
- Putting the badge in your README
- Coverage badge in action
- On the shoulders of giants
- Conclusion
The JetBrains Kover Gradle plugin is a minimal-fuss code coverage solution for your JVM project. In many cases, it may even just work out of the box.
Simply apply the plugin, and a new koverReport task will be available. When run, it generates an HTML coverage report that you can open and browse.
However, while useful, it probably won't be long before you want to convert this:

into a badge that you can add into your GitHub README:
Accomplishing this is what we'll cover in this post.
The big picture
Before we jump in, let's take a bird's eye view of what we're going to do:
- Create a gist in GitHub
- Generate an auth token so that your gist can be overwritten by a script
- Add a Gradle task that outputs the coverage value that you want to show
- Create a script that runs the task and writes badge values into your gist
- Add a badge into your README whose values are read from the gist
This post does not go into detail about the following topics, so you may need to refer to their official docs if I rushed over something you didn't fully understand:
Create a gist
Normally, people use gists as a way to share code snippets with one another, but fundamentally, a gist is simply a text file that GitHub hosts for you.
Start by going to https://gist.github.com/.
We're going to create a dummy JSON file. Don't worry about its contents as it will be overwritten by a later step. GitHub won't let it be empty, though, so just type in some random text to start.
You can name the file anything you want (and if you change your mind, it's easy to rename later). The real goal is to get the unique ID value that GitHub generates for your gist. I might recommend <yourproject>-coverage-badge.json (with <yourproject> substituted with your actual project name).

When ready, press the Create Secret Gist button!
You will be sent to a new page. Check the URL of that page to get the gist's ID:

You won't need this ID for quite a few steps, but it's good to know where to find it.
Create a gist token
We want to allow a script to modify the recently created gist on our behalf. To accomplish this, we need to create a token that can be used to authorize edit access to our gists.
To start, log into GitHub and select your Settings page:
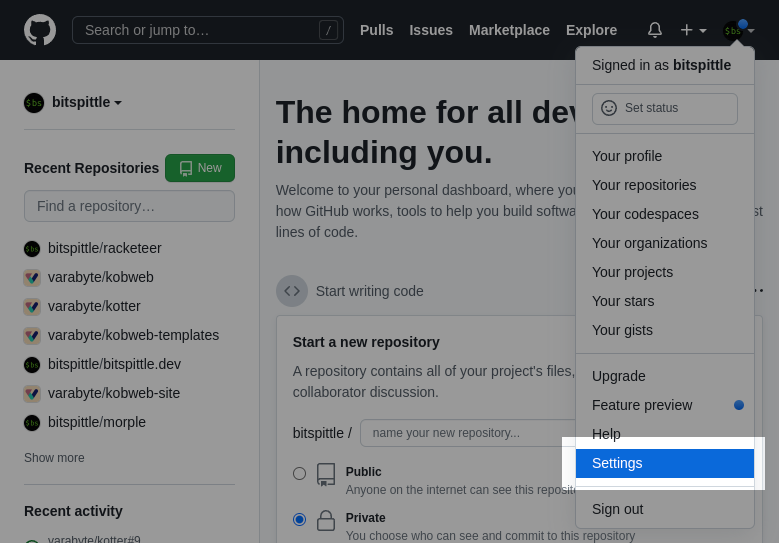
Click on the Developer settings menu item, which is at the bottom of a long list:
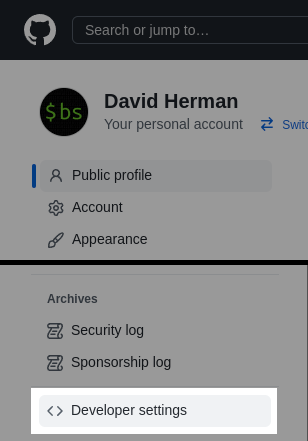
Once in there, click on Personal access tokens and then the Generate new token button:

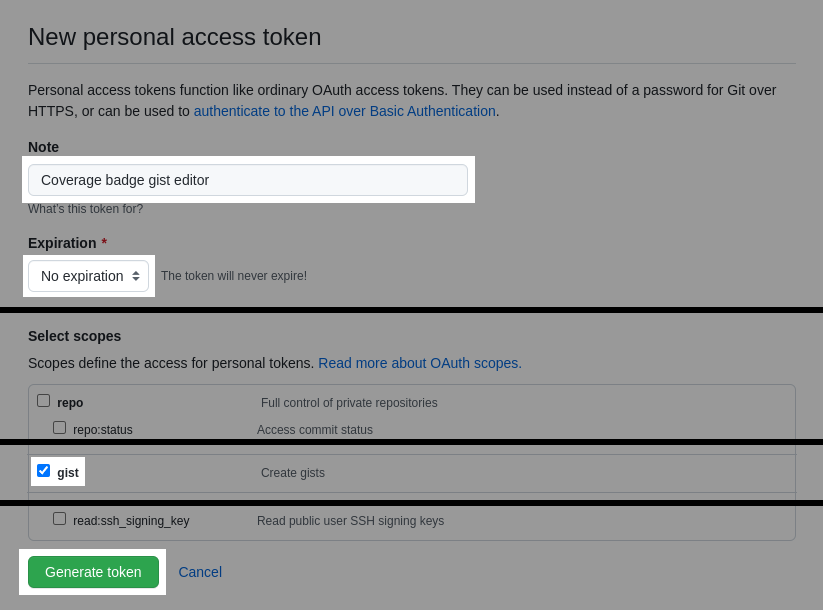
We'll create a token that can only access gists (limiting the potential damage if it ever leaks).
Create any description you want for it. I chose "Coverage badge gist editor" so I could remember later why I created it.
Next, I set my token to never expire. Hey, I'm just a simple guy who is developing hobby open source projects, so I'm not too worried about my gist token getting stolen, sold on the black market, and abused or whatever.
However, best practices require I mention that tokens should expire, and then you should recreate a new one and update all affected workflows when it does. I'll leave that final decision up to you. If you're on the fence, just create a non-expiring token for now. You can always delete it later.
Select only the gist permission, and then click on the Generate token button.
Press the "copy" icon to copy the token ID that was just generated.
This copy step is very important, because if you leave the page before you do so, the ID is lost forever. If that happens, you'll have to delete the token and redo this section.
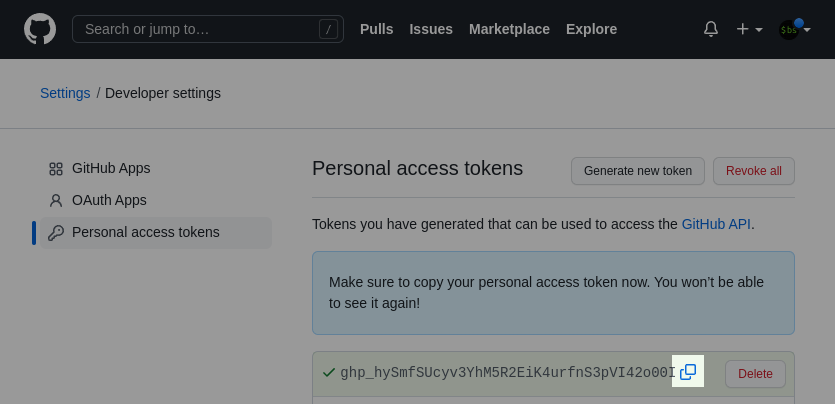
Normally, leaking secrets like this in public is not good! Of course, in this case, I have long since deleted this access token, so there's no harm in exposing it, and I decided to leave it in this post for educational purposes. But please treat your own token with more respect!
Create a gist secret
Now that we have our token ID copied into our clipboard, we want to put it somewhere where GitHub will be able to access it without us checking it in as plaintext somewhere. This is accomplished with GitHub secrets.
Secrets are easy to add! Visit the project you want to add the badge to, and open up its Settings page:

Click on Secrets > Actions, then on the New repository secret button:
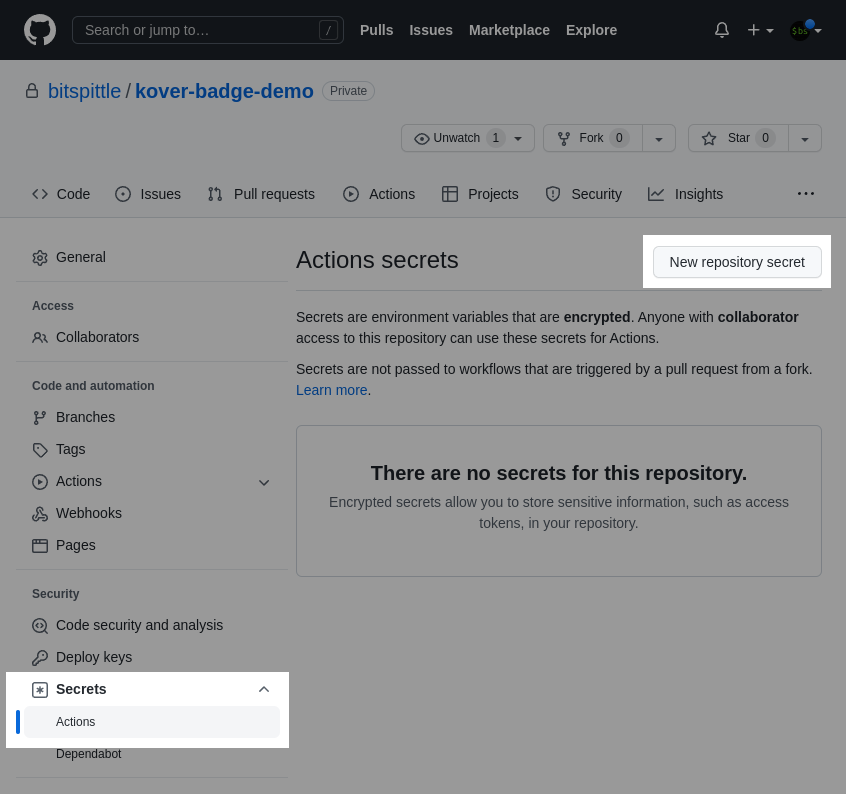
Pick a name for your secret. We'll reference it later, so remember it! I used GIST_SECRET.
Paste the token ID from your clipboard into the Secret textbox, then press the Add secret button:
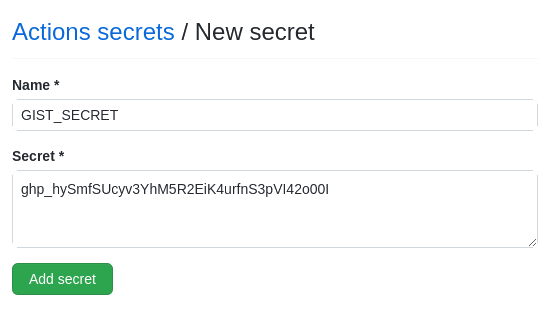
That's it for now. Let's move our attention to Gradle next.
Create a gradle task
At the beginning of this post, I mentioned that koverReport generates an HTML report. This is true, but it also generates an XML report. In fact, there are koverHtmlReport and koverXmlReport tasks you can run directly.
The Java standard library (which Gradle exposes) already has access to an XML parser, so what we'll do here is create a simple task that depends on the koverXmlReport task, loads the XML file it generates, parses it, calculates the coverage percentage that we want, and prints it to the console.
The Kover report
A Kover XML report looks something like this, with the coverage values we're interested in stored in children elements of the root report tag:
<report name="Intellij Coverage Report">
  ...
  <counter type="INSTRUCTION" missed="6591" covered="5058"/>
  <counter type="BRANCH" missed="565" covered="236"/>
  <counter type="LINE" missed="809" covered="700"/>
  <counter type="METHOD" missed="375" covered="386"/>
  <counter type="CLASS" missed="194" covered="156"/>
</report>
In most cases, when people think of coverage, they are probably thinking of line coverage. You can read more about the different types of coverage counters if you'd like, but we're just going to pull out the report's "LINE" data in this tutorial.
Gradle task to parse the Kover report
In a Gradle build script (the one which is using the Kover plugin), paste the following task registration somewhere in there:
import javax.xml.parsers.DocumentBuilderFactory

// IMPORTANT! Must be defined in the plugins block:
// plugins { id("org.jetbrains.kotlinx.kover") version ... }

tasks.register("printLineCoverage") {
    group = "verification" // Put into the same group as the `kover` tasks
    dependsOn("koverXmlReport")
    doLast {
        val report = file("$buildDir/reports/kover/xml/report.xml")

        val doc = DocumentBuilderFactory.newInstance().newDocumentBuilder().parse(report)
        val rootNode = doc.firstChild
        var childNode = rootNode.firstChild

        var coveragePercent = 0.0

        while (childNode != null) {
            if (childNode.nodeName == "counter") {
                val typeAttr = childNode.attributes.getNamedItem("type")
                if (typeAttr.textContent == "LINE") {
                    val missedAttr = childNode.attributes.getNamedItem("missed")
                    val coveredAttr = childNode.attributes.getNamedItem("covered")

                    val missed = missedAttr.textContent.toLong()
                    val covered = coveredAttr.textContent.toLong()

                    coveragePercent = (covered * 100.0) / (missed + covered)

                    break
                }
            }
            childNode = childNode.nextSibling
        }

        println("%.1f".format(coveragePercent))
    }
}
You can read more about Java's DocumentBuilder class if you'd like. But above, we are parsing the XML report generated by Kover, looping through all children of the root ("report") element until we hit one whose name is "counter" and has the "LINE" type attribute. The code is fairly straightforward.
Running the task
To run a Gradle task where it hides its own logs so only your output is shown, pass in the -q (or --quiet) command line argument.
In other words, in a terminal, you can run:
$ ./gradlew -q printLineCoverage
46.4
Confirm that this is working for you before moving onto the next step.
GitHub Actions workflow
GitHub Actions is GitHub's approach to automating work, which is commonly used for continuous integration. A workflow is a script which defines one or more related jobs that run together in response to some event.
We'll create a workflow which updates our badge data every time new code is pushed onto the main branch.
In your project's .github/workflows folder (which you can create if it doesn't exist), create a YAML file (I called mine coverage-badge.yml):
# coverage-badge.yml

name: Create coverage badge

on:
  push:
    branches: [ main ] # !! CONFIRM THIS !!

jobs:
  build:
    runs-on: ubuntu-latest

    steps:
      - uses: actions/checkout@v3

      - name: Set up JDK
        uses: actions/setup-java@v3
        with:
          java-version: '11' # !! CONFIRM THIS !!
          distribution: 'adopt'

      - name: Generate coverage output
        run: |
          echo "COVERAGE=$(${{github.workspace}}/gradlew -q printLineCoverage)" >> $GITHUB_ENV

      - name: Update dynamic badge gist
        uses: schneegans/dynamic-badges-action@v1.7.0
        with:
          auth: ${{secrets.GIST_SECRET}} # !! CONFIRM THIS !!
          gistID: d6b5fcf2e961f94780a3dbbc11be023c # !! CHANGE THIS !!
          filename: myproject-coverage-badge.json  # !! CHANGE THIS !!
          label: coverage
          message: ${{env.COVERAGE}}%
          valColorRange: ${{env.COVERAGE}}
          minColorRange: 0
          maxColorRange: 100
Review the lines annotated above with !! CONFIRM THIS !! and !! CHANGE THIS !!.
In my project, the main branch is called main, but make sure that this is true for your project as well. Legacy projects may use master, for example.
After that, the first steps of the script tell GitHub to fetch the latest code and make sure Java 11 is available. You may need to use a higher JDK version in your own project, in case you're using any JDK 12+ features or standard library APIs.
Finally, be sure to update gistID and filename to your specific values.
You may copy the rest of the values as is.
Step: Generate coverage output
This workflow step runs our custom Gradle task (printLineCoverage), saving its output into a variable (COVERAGE) that gets put into an environment that can be accessed by the rest of the script.
Setting environment variables in workflows is a pretty handy trick in general. You can read more about this in the official docs.
You may need to specify the Gradle task more explicitly, e.g. :myproject:printLineCoverage, in case there are any ambiguities in your own project, such as multiple submodules using Kover.
Step: Update dynamic badge gist
The final workflow step configures the Dynamic Badges action, which is the action that will overwrite the gist we created earlier.
- The
authfield uses the secret we saved in a previous section. Be sure the name here matches what you chose then. - The
gistIDfield should be set to the ID generated by GitHub when you created your gist (the one from the gist's URL). - The
filenamefield can actually be set to whatever you want. If you choose a different name than what you used before, this will overwrite it. Still, just set this to what you used before. - The
labelfield is the text that will show up on the left side of the badge. - The
messagefield is the text that will show up on the right side of the badge. Note that here, we set its value to the output from the previous step's Gradle task. We append a "%" to the end because it looks nicer when presented to users.
While you can specify the color of your badge yourself, the Dynamic Badges action supports a convenient feature where, if you declare a range plus a numeric value somewhere inside that range, it will auto set the color for you.
If your value is at the minimum end, the badge will be red, and if at the max end, it will be green. Anywhere in the middle is interpolated on a gradient, so that e.g. 50% will be yellow.
To take advantage of this feature, we set minColorRange to 0, maxColorRange to 100, and valColorRange to the output from the previous step's Gradle task.
Dynamic badges can be configured in other ways as well. See the official docs for full details.
Test your workflow
When your workflow is done, check it in and submit it. Go to your project's Actions tab and make sure that you see your workflow running, and confirm that it eventually succeeds.
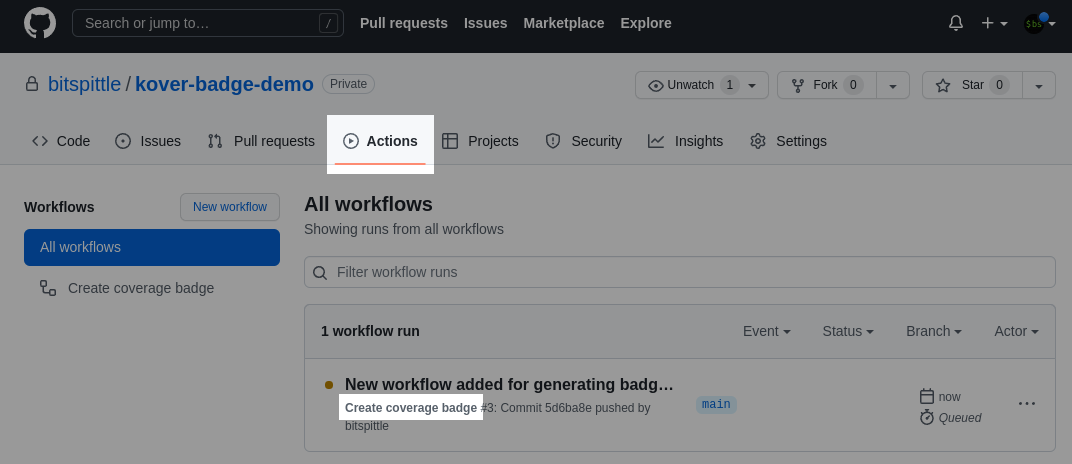
Once you get a green checkbox, check your gist. It should be updated with real values now!

Putting the badge in your README
At this point, we're nearly done. To create a badge whose values are read from a JSON file, you can use the shields.io endpoint API with the following snippet:

where you replace xxxxxxx with your username (e.g. bitspittle), yyyyyyy... with your public gistID (e.g. d6b5fcf2e961f94780a3dbbc11be023c), and the filename with your gist's final file name.
Add that snippet to the top of your README, commit it, and push it into GitHub.
Finally, visit your project, and take a moment to admire your new, shiny badge -- that was a lot of work!
Coverage badge in action
You can see where I created a coverage badge in my Kotter project (check the top of the README).
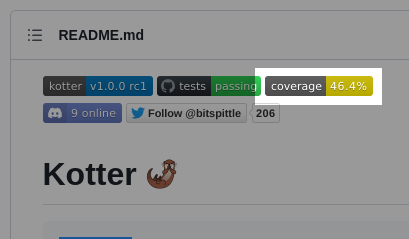
You may want to reference my...
- Badge gist
- README badge definition
- Gradle build script sections (here, defining the task and here, configuring Kover)
- GitHub Actions "Create coverage badge" workflow
On the shoulders of giants
In addition to the official docs, I found the following sources particularly helpful:
- Article: "Coverage Badge with GitHub Actions - FINALLY!"
- Stack Overflow: "How to get version name from Android Gradle file in GitHub Actions?"
Conclusion
Honestly, this process was more involved than I would have expected. But having a coverage badge on your project's README page is totally worth it.
And finally, you don't have to stop here! By combining Gradle tasks, the Dynamic Badges action, and GitHub Actions workflows in general, you can definitely create some amazing custom badges.
